Chapter 1: First Generation - Rune Factory 2 Guides
This walkthrough isn't going to be one that holds your hand through this entire game, there are too many different ways to play a game like Rune Factory 2. Instead, I am going to focus on guiding you through the parts of the game that don't change, things like how to advance the story and unlock the things we need to make that easier.
Before we get started I think one important thing to mention about this game is that it's split into 2 Generations. During the first generation you play the character named Kyle who lost his memory and is finding his way in a new town. The first generation lasts until you get married, have children and finish construction of the school.
I will be building the entire walkthrough around this concept since there are certain things you'll want to finish during the first generation before progressing to the next one. Additionally, there are certain things in this game you can only do during either the first or second generations. One good example is all of the barricades which block your way in the dungeons you explore early on in this game can't be bypassed until the second generation.
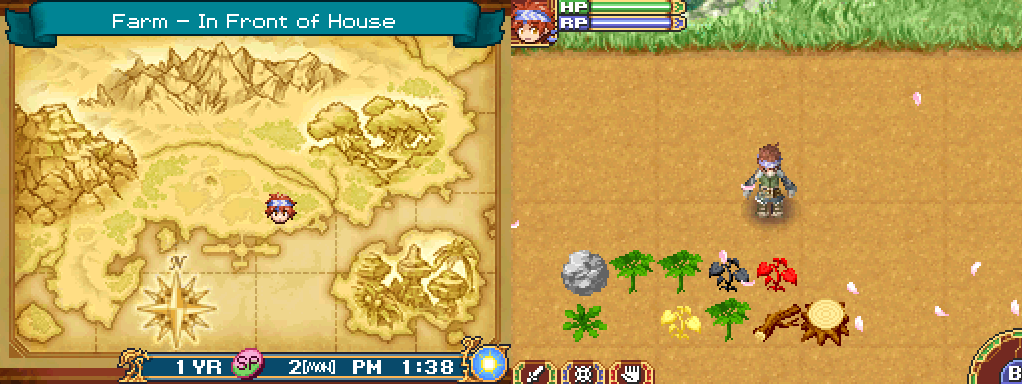
When you first start playing this game you'll want to clear your field of all the herbs, plants, branch and stones that spawn there and sell everything. Mana tells you about the Shipping Bin next to your house and how to properly use it, you'll want to use the L button to quickly cycle through items and the A button to place them inside of the Shipping Bin.
Each day things will spawn in your field so you'll be able to collect some early game money this way. Also, each of the three dungeon areas that we have access to right now have fields in them too which you can collect goodies from each day. There is also typically a tree that grows in these areas which you can harvest fruit from. Keep an eye out as you're exploring for these trees.
Another thing you should be aware of is that you can hold down the B button to charge up certain tools that you use. This will allow you to water or hoe an entire 3x3 area in a single button press rather than having to do each square individually. Charging up your Tools is also important when it comes to clearing out stumps and rocks on your farm and in the dungeons.
Once you save up enough money you can start buying crops which you can then plant, water and harvest - this will be one of your main gameplay rotations for making money in this game. If you have yet to plant any crops yet, one thing to note is an entire bag of seed will cover a whole 3x3 tile on your farm. The bags of seed seem a bit of expensive and this is why.
Aside from farming crops, you'll also want to do Bulletin Board quests each day/whenever you can. You will need to complete these quests to get married in this game and to unlock various upgrades/new items. The first quest you're required to do is a quick delivery for Mana but after that each NPC in town will offer you various quests through the Bulletin Board.
When you are at the Bulletin Board pay attention to the person who is giving you the task, you'll need to visit them at the start of the task after you accept it from the board. Additionally, paying attention to who starts each task will help you figure out which ones you'd like to complete for which tools.
Below is a list of all the tools you can get from Bulletin Board quests along with who starts the quest/gives you the tool. For the most part you will need to finish the quest they give you and the tool will be given as a reward for completing the quest. The exception to this is Gordon, he gives you the Hammer at the start of the quest.
Barret: Fishing Rod (Pole)
Gordon: Hammer
Tanya: Axe
Jake: Sickle
Herman: Milker
Egan: Clippers
Cecilia: Pet Glove
Rosalind: Harvest Basket
Cecilia (Quest 2): Brush
Out of all the tools mentioned above, the Hammer and Axe are the two most important (in my opinion). You can use the Axe that Tanya gives you to clear stumps from your farm and from the farm land in the wilderness dungeons. The Hammer is used to clear boulders from your farm along with smashing the gem rocks in the dungeons. Gem rocks respawn daily and give you valuable gems/ore that you can sell or hold onto.
In my experience when doing tasks on the Bulletin Board the hardest part of them is finding the person who gives the task and/or the person they want you to take an item to. Until you learn everyone's location in town it's difficult locating a specific person - so I have made a list!
The section below is something I created for myself to help me locate the various NPCs when it came to fulfilling their Bulletin Board tasks. Below you will find a list of all the NPCs who live in Alvarna and where you can find them during the daylight hours on non-Holidays. Keep in mind that some days they will be in a different location so the list isn't accurate for a 24/7 schedule.
(1st Generation) Location of NPCs in Alvarna:
Alicia: Alicia is found at the Alvarna - Port every day unless it is raining.
Barrett: You can find Barrett in a few different places, Cherry Blossom Square or Alvarna - East End (in front of the Pumpkin General Store) are the most common places when it isn't raining.
Byron: Byron is the Mayor and can be found in his house in Alvarna - West End.
Cammy: Most often you can find Cammy in the De Sainte-Coquille Park during the day with Roy; in the evening she goes to the Wisdom Bathhouse. When it is raining you can find her in the church.
Cecilia: She is a maid inside of the De Sainte-Coquille Manor in Alvarna - West End.
Dorothy: You can find Dorothy working at the Doctor's Office on most days.
Douglas: Douglas runs the Pumpkin General Store with Mana and you can find him there most days.
Egan: He runs the Eagle Inn in Alvarna - West End.
Gordon: You can find Gordon at the church every day except on Festival days.
Herman: Herman is one of the rich people who lives in the De Sainte-Coquille Manor in Alvarna - West End.
Jake: Jake is the jerk inside of Tanya's weapon shop in Alvarna - East End.
Julia: She runs the Bath House in Alvarna - East End. Go south out of your farm and you'll run right into her building.
Mana: Mana runs the Pumpkin General Store with her father Douglas. You can find the Pumpkin General Store in Alvarna - East End; exit south out of your farm and it's the building on the left.
Max: Max is one of the rich people who lives in the De Sainte-Coquille Manor in Alvarna - West End.
Natalie: She is the doctor in the village, you can find her inside the Clinic in Alvarna - East End.
Ray: You can find Ray inside the Clinic on most weekdays. The clinic is located in Alvarna - East End.
Rosalind: Most commonly I found her in the Chapel or in the De Sainte-Coquille Manor. Rosalind is the most active person in the town and has various places she can be depending on the day and time. Check the Rune Factory 2 Wiki for a full schedule.
Roy: Roy is commonly found in De Sainte-Coquille Park with Cammy on sunny days or in the Church with Cammy.
Tanya: Tanya can be found inside of her weapon store in Alvarna - East End on pretty much every day.
Yue: Yue changes location depending on the day of the week with 2 exceptions. Around 9am on most days you can find Yue in Alvarna - North Square (just east of your farm) also during the night time you can always fine Yue in Trieste Forest. Other than these times, you can always find Yue hanging around the entrance to one of the wilderness dungeons. A list of which dungeon she hangs out in depending on the day is listed below.
Monday: Trieste Forest
Tuesday: Blessia Island
Wednesday: Messhina Valley
Thursday: Padova Mountains
Friday: Trieste Forest
Now that we've got all of that out of the way, let's go over the other important things you should do during your first year. When you are ready to build a Barn and start taming monsters you should visit the Mayor in Alvarna - West End and tell him you'd like to build a Barn. If I am not mistaken you'll need to complete Cecilia's quest before a Barn is available for construction, Cecilia will also give you the Pet Glove item which we need to tame monsters.
To build a Barn you'll need 5000G and 50 pieces of Wood, both of these requirements are very easy to meet. Cecilia will actually give you 100 Wood when you complete her first task along with the Pet Glove. Once the Barn is built you'll find it on the screen to the west of your farm (pictured below) - it's pretty hard to miss.
Once you've built your Barn it's time to buy some feed to put into it and then tame some monsters. You can buy feed directly from Mana's store or you can buy some Grass Seeds, plant it, then harvest with your Sickle when it's ready. Feed goes into the hole that's next to the door leading into your Barn. Each monster will eat 1 feed per day automatically - you don't have to manually feed them.
Growing Grass is the best way to feed your monsters since it's significantly cheaper and you can keep cutting the Grass every 3 days since it regrows. Each tile of Grass will give you 4 Feed which means for all 9 tiles you'll get 36 Feed in total. As you can probably imagine this is the most cost effective way of feeding your monsters.
If you don't want to plant the Grass on your farm keep in mind that you can plant it in the dungeons instead! Each of the wilderness dungeons to the north of your farm have fields where you can plant various crops. You'll have to visit them every day that it's Sunny to water your crops but I recommend you visit these areas daily regardless.
Monsters that you tame in this game can be used for a variety of different things - only certain monsters can perform certain tasks though. Some of the monsters can help you Water/Harvest your field, others can be used for various products like Milk or Fur. Pay attention to the type of monster you tame and it's easy to figure out which of these categories the monster will fall into. An Orc, for example, can't be milked but they can help you Water/Harvest your field!
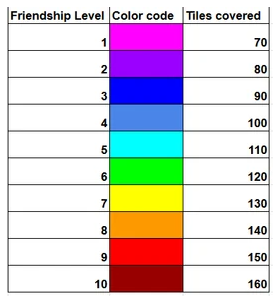
When it comes to Watering and Harvesting your field you may notice that your monster starts in the top left and goes across each row zig zagging back and forth. The Friendship Level of your monster determines how much of your farm he covers - below is a helpful chart from the Rune Factory 2 Wiki that demonstrates how raising Friendship Level helps.
All Monsters start work at 4pm in the evening too and they will continue working even after you go to sleep. Usually I always leave some crops in the top 3 rows for my Monster to pick when I have one on Harvesting duty; once I get more Friendship Levels with them then I will leave more crops up.
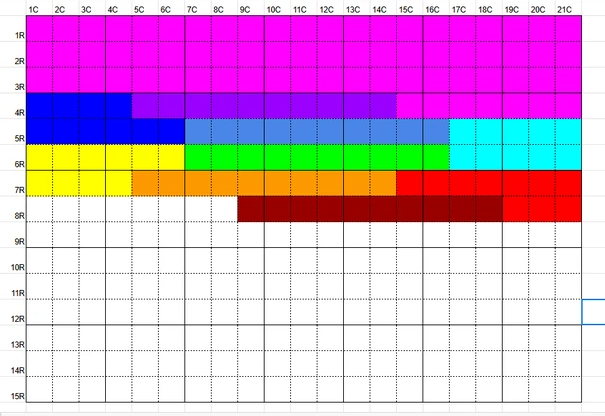
How much of your Farm a Monster will Harvest (Different colors are for different Friendship Levels)
Almost all monsters that you tame can accompany you while exploring dungeons which gives you some extra survivability while out and about too. I recommend you plant some Grass at this time and also tame a few monsters, I personally tamed 2 Orc enemies, 2 Chickens, 2 "Cows" and 1 Wolf. You can find the Chickens at night in the Messhina Valley - they spawn in the same location as the "Cow" enemy that is here.
Tip: Goblin Pirates on Blessia Island can perform the Watering task on your farm - be sure to Tame one as soon as possible!
On that same note, different monsters spawn during the day and at night. So if you'd like to check out everything that's available be sure to visit each 'dungeon' both during the day and during the night to see all of the different enemies. I'd also recommend planting some crops in each of the dungeons too, it'll require a lot of running around each day but will allow you to maximize your profits. I'll talk more about this later.
The last thing I feel important to mention right now is the sales that go on in the Pumpkin General Store. Once a month during the 2nd/3rd week of the month there will be a sale at the General Store; you will always get a notification in the mail when this happens.
During the Summer month the sale is 30% off and during the Winter month the sale is 40% off. I strongly recommend you save money for each of these days and then buy all of the Seeds you need for the upcoming months. Below is a quick list that will tell you which day of the month the sale is for and how much % off you'll get.
Store Sales:
Spring 15th: 10% Off
Summer 16th: 30% Off
Fall 14th: 20% Off
Winter 15th: 40% Off
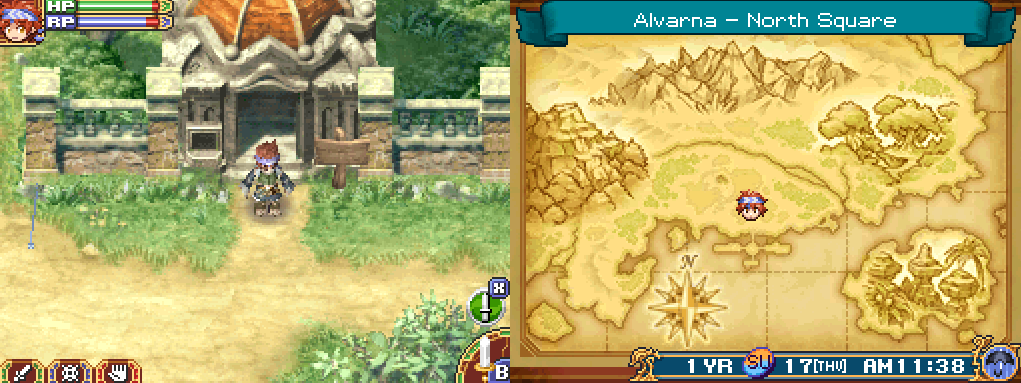
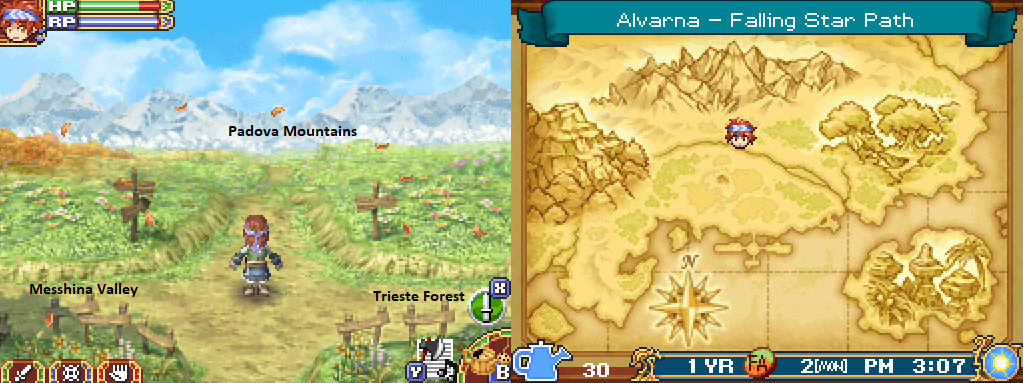
Now, let's cover the last bit of information I think you should know about - the wilderness dungeons. To the north of Alvarna you'll find a crossroads (pictured above) that leads you to 3 different wilderness dungeons. You can also take the boat at the docks in the southern portion of Alvarna to a place called Blessia Island, this is the fourth dungeon.
Each of these 4 dungeons covers a different season, I will list all of them below so you know which crops can be planted there.
Spring: Trieste Forest
Summer: Blessia Island
Fall: Messhina Valley
Winter: Padova Mountains
All of these dungeons are rather small currently and you will not be able to access the entire dungeon until the 2nd Generation. For right now each dungeon has 2 gardens in it that you can plant crops in, I'd recommend taking advantage of all the fields except Blessia Island. It's up to you but I find Blessia Island to be too far of a daily run to water my crops so I typically only plant crops in the other 3 locations.
Before you plant any crops in these dungeons I recommend that you level up your character a bit and get used to fighting too. Each time that you come to these dungeons to maintain your crops you're going to have to defeat the enemies because they'll annoy you too much if you leave them alive. To do this and still have enough RP left over to maintain your crops you'll have to have some basic combat experience.
A tip to level up all of your skills faster: when your crops finish growing on your farm they'll leave behind floating blue spirit things that restore about half of your RP. Collect these and then go inside your house since it stops time from progressing and spam attack while using a weapon. You can spam the Hoe, Axe or Hammer too and you'll level up different skills. Then once you get low on RP head back out to your farm and collect more floaty orbs for RP!
My normal gameplay rotation when I was trying to earn money looked something like this:
Money Making Gameplay Rotation:
1. Plant/Water/Harvest Crops on my Farm
2. Visit Trieste Forest and maintain Crops there/Smash Gem Rocks/Collect Apples
3. Go to Padova Mountains and maintain Crops, Smash Gem Rocks
4. Head over to Messhina Valley and maintain Crops, Smash Gem Rocks and Collect Grapes
5. (Optional) Visit Blessia Island and maintain Crops, Smash Gem Rocks and Collect Oranges
Other than this rotation I focused on completing Bulletin Board tasks, doing work for my tamed Monsters and courting my woman. In this game I picked Alicia as my wife since she was the most mature looking woman in the village. You can pick whomever suits your own fancy, of course.
While on the topic of Alicia, she is a fortune teller with the ability to alter the future (if you pay her enough). You can buy a fortune from Alicia that can make it sunny the next day or make it rain the next day, depending on what you want. I personally almost always buy the fortune that makes it rain the following day because this means I don't have to water any crops in the dungeons (or on my farm) for that day.
It only costs 1000G each time you want to make it rain the following day which is an amount that we can easily make back with a single crop harvest. The biggest downside to making it rain every other day is if you're courting Alicia you won't be able to raise her affection as quickly. Since on days when it rains you won't be able to buy fortunes from her... However if you're not courting her I don't see any real downside to doing this.
For more information about courting Alicia or any of the other bachelorettes I recommend you check out the guides that I link to below. Also, for details about making friends with all of the other villagers you should check out my Gift List which I also link to below.
Rune Factory 2 Marriage & Love Points Guide
Rune Factory 2 Gift List & Friendship Guide
Both of these guides have some of the same information but they're both worth reading if you'd like to complete as much as possible in this game. In order to unlock most of the Bulletin Board requests you'll need to raise your Friendship Level with all of the villagers. Each time you raise your Friendship Level by 1 the villager will offer you a new quest via the Bulletin Board.
Raising your Friendship Level with the villagers is another one of the main gameplay loops of this game. Usually it's easiest to just talk with the villagers every time you see them instead of trying to give out gifts that all of them like. However, I would recommend giving them gifts on their Birthday for the big Birthday bonus that it gives you.
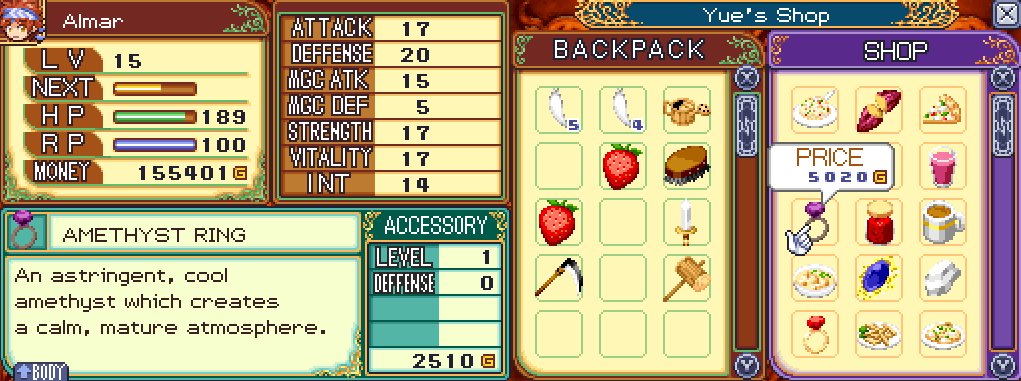
The easiest way to get many of the villager's Birthday Gifts is to visit Yue's Shop. You can typically find Yue at the entrance to one of the dungeons or to the west of your farm; she sells a variety of things including unique Accessory items and many of the villager's favorites. A screenshot of Yue's Shop is shown below.
I strongly recommend you upgrade your Accessory items at Yue too whenever you get enough gold for that. By the end of the first year you should be flushed with gold if you spent a lot of time farming throughout the year - you'll have more than enough to buy whatever you'd like from Yue.
While we're on the topic of upgrading your gear and dungeons, let's talk about one of the best places for you to level up at. Usually when I run out of farm work to do and I still have time to kill before I go to sleep I will head into the Padova Mountains dungeon with a monster and let my monster fight the wolves inside.
Depending on your monster's Friendship Level he may obliterate the wolves or he may get eaten up after a few hits. In order to raise your monster's Friendship Level you'll have to get the Brush tool from Cecilia's 2nd Bulletin Board quest and use it on your monsters once a day. From what I have seen your Friendship Level will never decrease once you stop using the Brush on them so you only have to do this once.
What I like to do is during the Winter months (since I have little to do anyway) I will spend every day using the Brush on all of my monsters. Usually all it will take is a full month of using the Brush on your monsters to cap their Friendship Level at 10. A monster with a Friendship Level of 10 will completely annihilate most of the other monsters you come across in the various dungeons.
Also, having a higher Friendship Level will allow your monsters to cover more ground when it comes to Harvesting/Watering your crops. In other words, raising their Friendship Level is useful for more than just one thing - so I strongly recommend you do it!
My favorite location to level up at is in the northern portion of the Padova Mountains - Flowing River map. If you stand at the location you see me in the screenshot below you'll get an unlimited respawn of wolf enemies and your monster guardian will fight them all on your behalf.
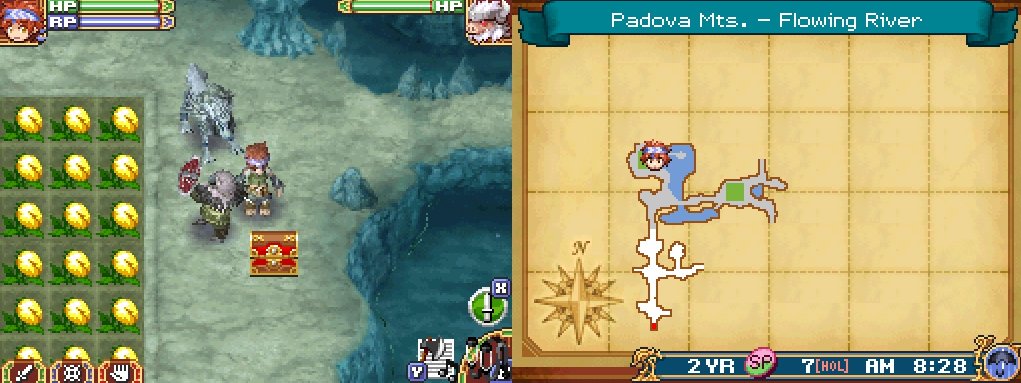
My favorite location to level up (mostly AFK)
This is a 'mostly' AFK spot, you don't have to do much aside from occasionally grab the chests that the wolves leave behind when defeated. Sometimes you will also have to reposition your character if you get pushed too far away or if the wolf enemies get stuck on chests and can't reach you. Other than these scenarios though, you can leave your character standing here for the entire in-game day and he'll earn EXP the whole time.
All of the EXP you earn during the first generation will carry over into the second as well - so the time you spend leveling here isn't wasted once you advance the game to the next generation. Before we cover how to move onto the 2nd generation the last topic I would like to talk about is the crop fields inside of the dungeons.
You've probably noticed already that Mana's General Store sells some seeds which take a "long time to grow". Many of these seeds take longer than 30 days to grow which is a bit of an issue because you only have 30 days to grow them on your actual farm. However, the fields in all of the dungeons never change season.
What this means is any crops that you'd like to grow that take more than 30 days should be grown in the dungeons instead of on your farm. I find this works well too because then all you have to do is run through each dungeon and water crops every day instead of watering/collecting from both the dungeon and your farm constantly throughout the weeks.
As I stated earlier, if you'd like to make your life a bit easier you can also buy Weather Fortunes from Alicia that make it rain the following day. This will save you a lot of time running around watering crops in all four of the dungeons and on your farm.
If you'd like you can save even more time by never watering the crops in the dungeon yourself. Depending on what crops you planted - most can go without being watered for a day or 2. As long as you keep up Alicia's fortunes and make sure it rains every other day you can let the crops grow solely from rain water. Just keep in mind they'll grow twice as slow if you do it this way.
Below is a step by step list of what I do once I am done making money and looking to advance the plot forward during the 1st generation.
Advancing The Plot Gameplay Rotation:
1. Visit Alicia and buy a Weather Fortune to make it rain the next day
2. Water crops on days when it is sunny
3. Run around town and talk to everyone you see (Festival Days most important)
4. (Optional) Give out Liked/Loved Gifts to speed up the process
5. Check Bulletin Board frequently and do any tasks that pop up
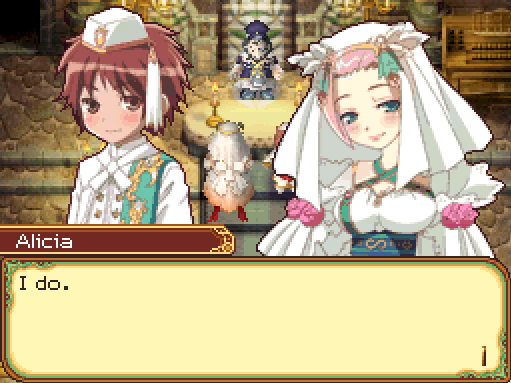
When you're finally ready to advance the plot forward you'll want to focus on the task list given above. Our goal is to raise the heart level of the girl we want to marry to 10 and then complete her final Bulletin Board task. Once you do this you'll propose to her and you two will immediately get married.
Tip: If you marry Alicia you can use her Fortune Telling every single day for free! I abused this and made it rain every single day to constantly water all of my crops.
After you're married you will have to wait a total of 9 days before your wife gets pregnant (wow that was quick). If you talk to her she'll inform you of the pregnancy and she will also ask you what biological sex you'd like your child to be. This is an important decision because it will determine what sex you play as during the second generation. Selecting boy means you'll control the boy and vice versa.
It will take 6 days for your child to be born (I mean...) after which you'll be able to construct the School by talking with Byron. You can find Byron in the Mayor's House in Alvarna - West End; the School will cost 100,000 Gold and 1,000 Wood to build. The School will be built in 10 days after you give Byron the required materials and funds.
This is all you need to do to advance to the second generation, once the School is built the moment you go to enter it with this character you'll trigger a scene that advances you to the second generation. Before approaching the School and triggering the final cutscene I recommend that you fulfill the quotas on my check list below.
2nd Generation Check List
1. Save up 1mil Gold
2. Have 35+ Monster Feed for each Monster
3. Stock up on Ore from Mining to repair Tools in 2nd Generation (Bronze, Iron etc)
4. (Optional) Have at least 1000 Wood
5. Plant Pineapple on Blessia Island
6. Plant Strawberry in Trieste Forest
Technically everything on the list above is optional, though I have marked some things as optional since they're more.... Optional than others. You can go into the 2nd generation completely unprepared and still do just fine - so don't worry about meeting every requirement if you're antsy about advancing the game and want to do so immediately.
Like I stated before, when you approach the School you'll trigger a scene and during that scene you'll advance from the 1st generation to the 2nd generation. You'll also get to watch a new intro cinematic that you'll see from now on which features the kids instead of Kyle, your previous main character.
Continue to 2nd Generation Walkthrough
Return to Rune Factory 2 Guides Index

